One of the main projects we are in the process of tacking on the RV is a modification to the electrical system. Our Crusader 5th Wheel came with a pretty basic but standard power setup consisting of a single 12 Volt deep cycle battery and converter/charger/circuit breaker panel with 120VAC 60 Hz available in the interior only when connected to a shore power supply or when running gasoline generator. The fridge, furnace, and hot water heater can all run off propane but we were still limited with no AC power for TVs, computers and AC outlets.
After a couple of years on the road and after watching so many of our friends upgrade to solar power systems that allow them to Boondock and Dry camp for extended periods without hookups and little or reduced generator usage, we have finally decided to upgrade our system so that we can join them and spend a little less time tethered to RV parks and campgrounds. This should be a great addition as we plan to again winter in the southwest where there are many opportunities like the ones we had a brief chance to explore last year boondocking in Quartzsite, Arizona.
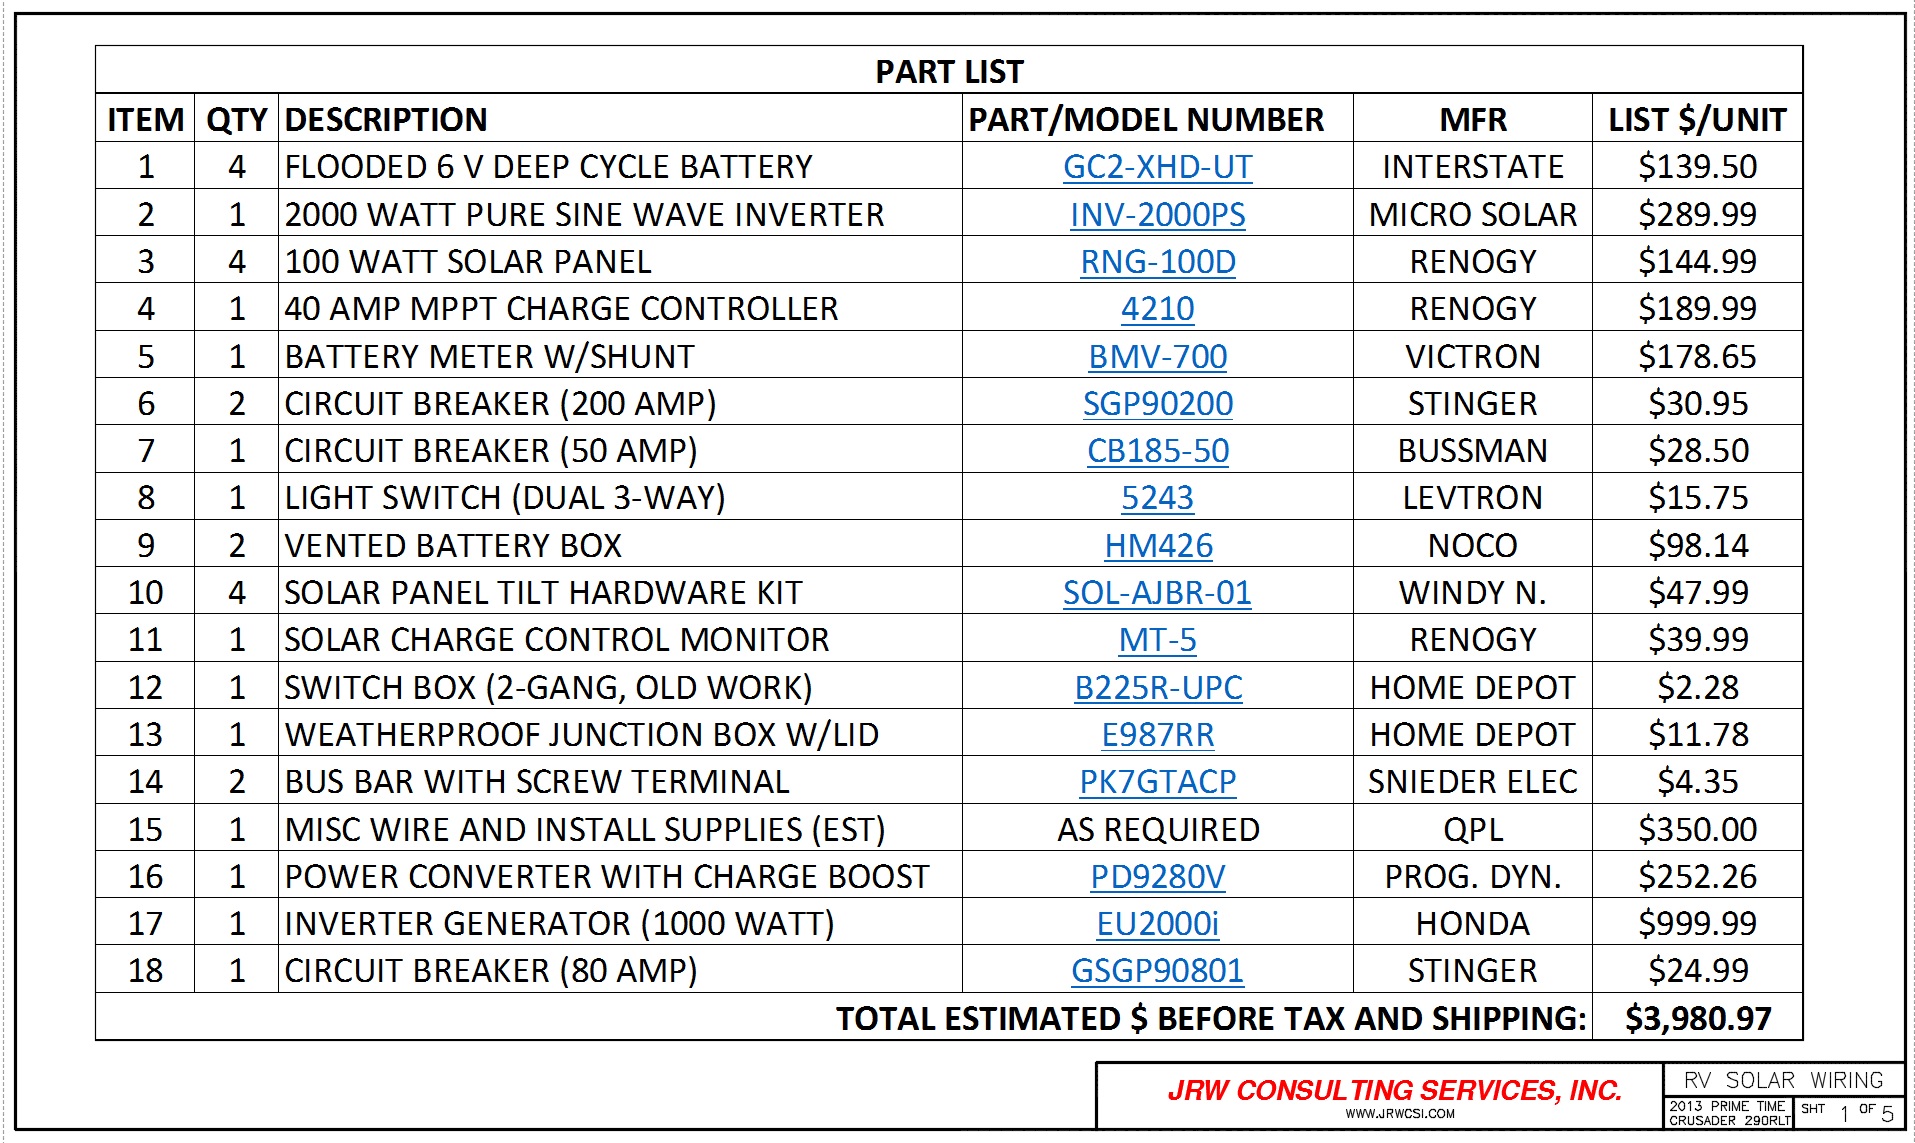
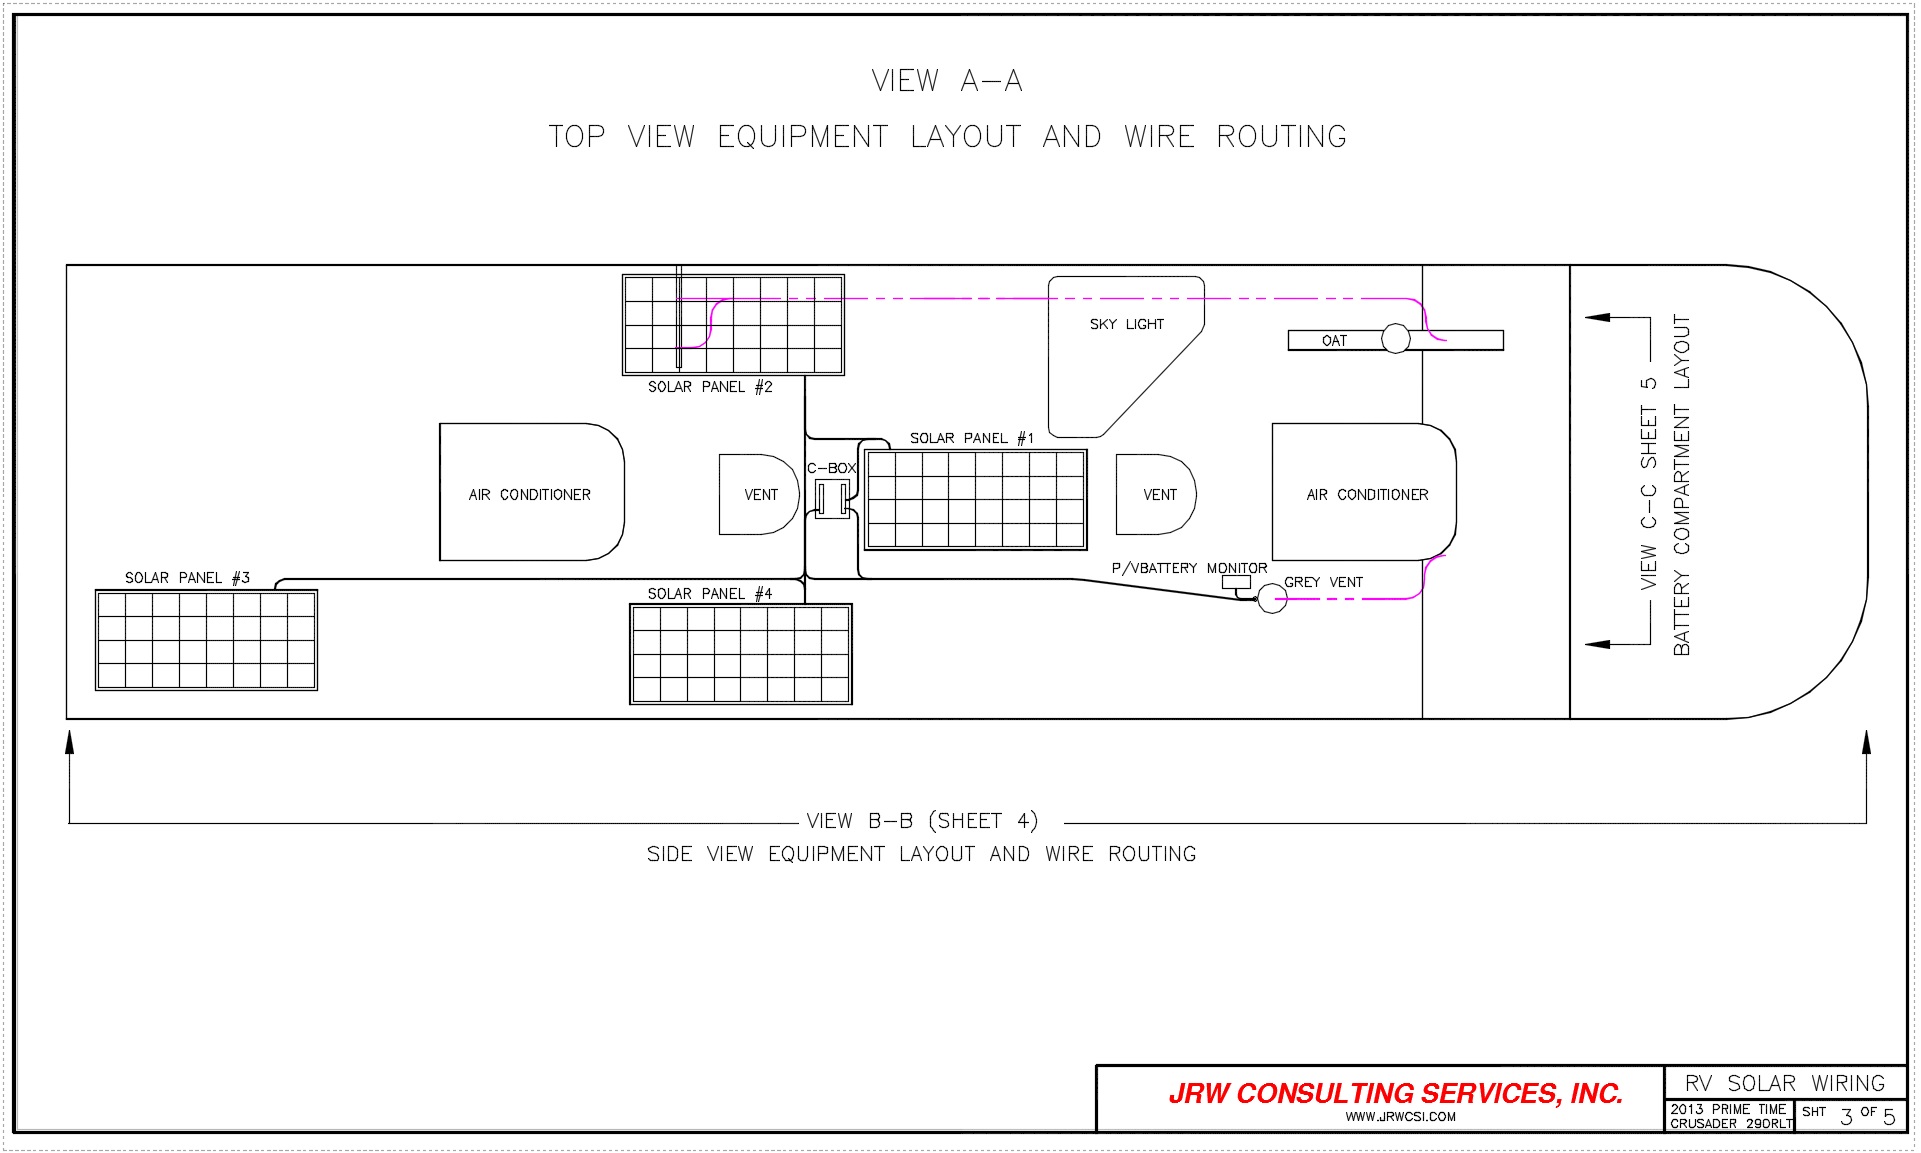
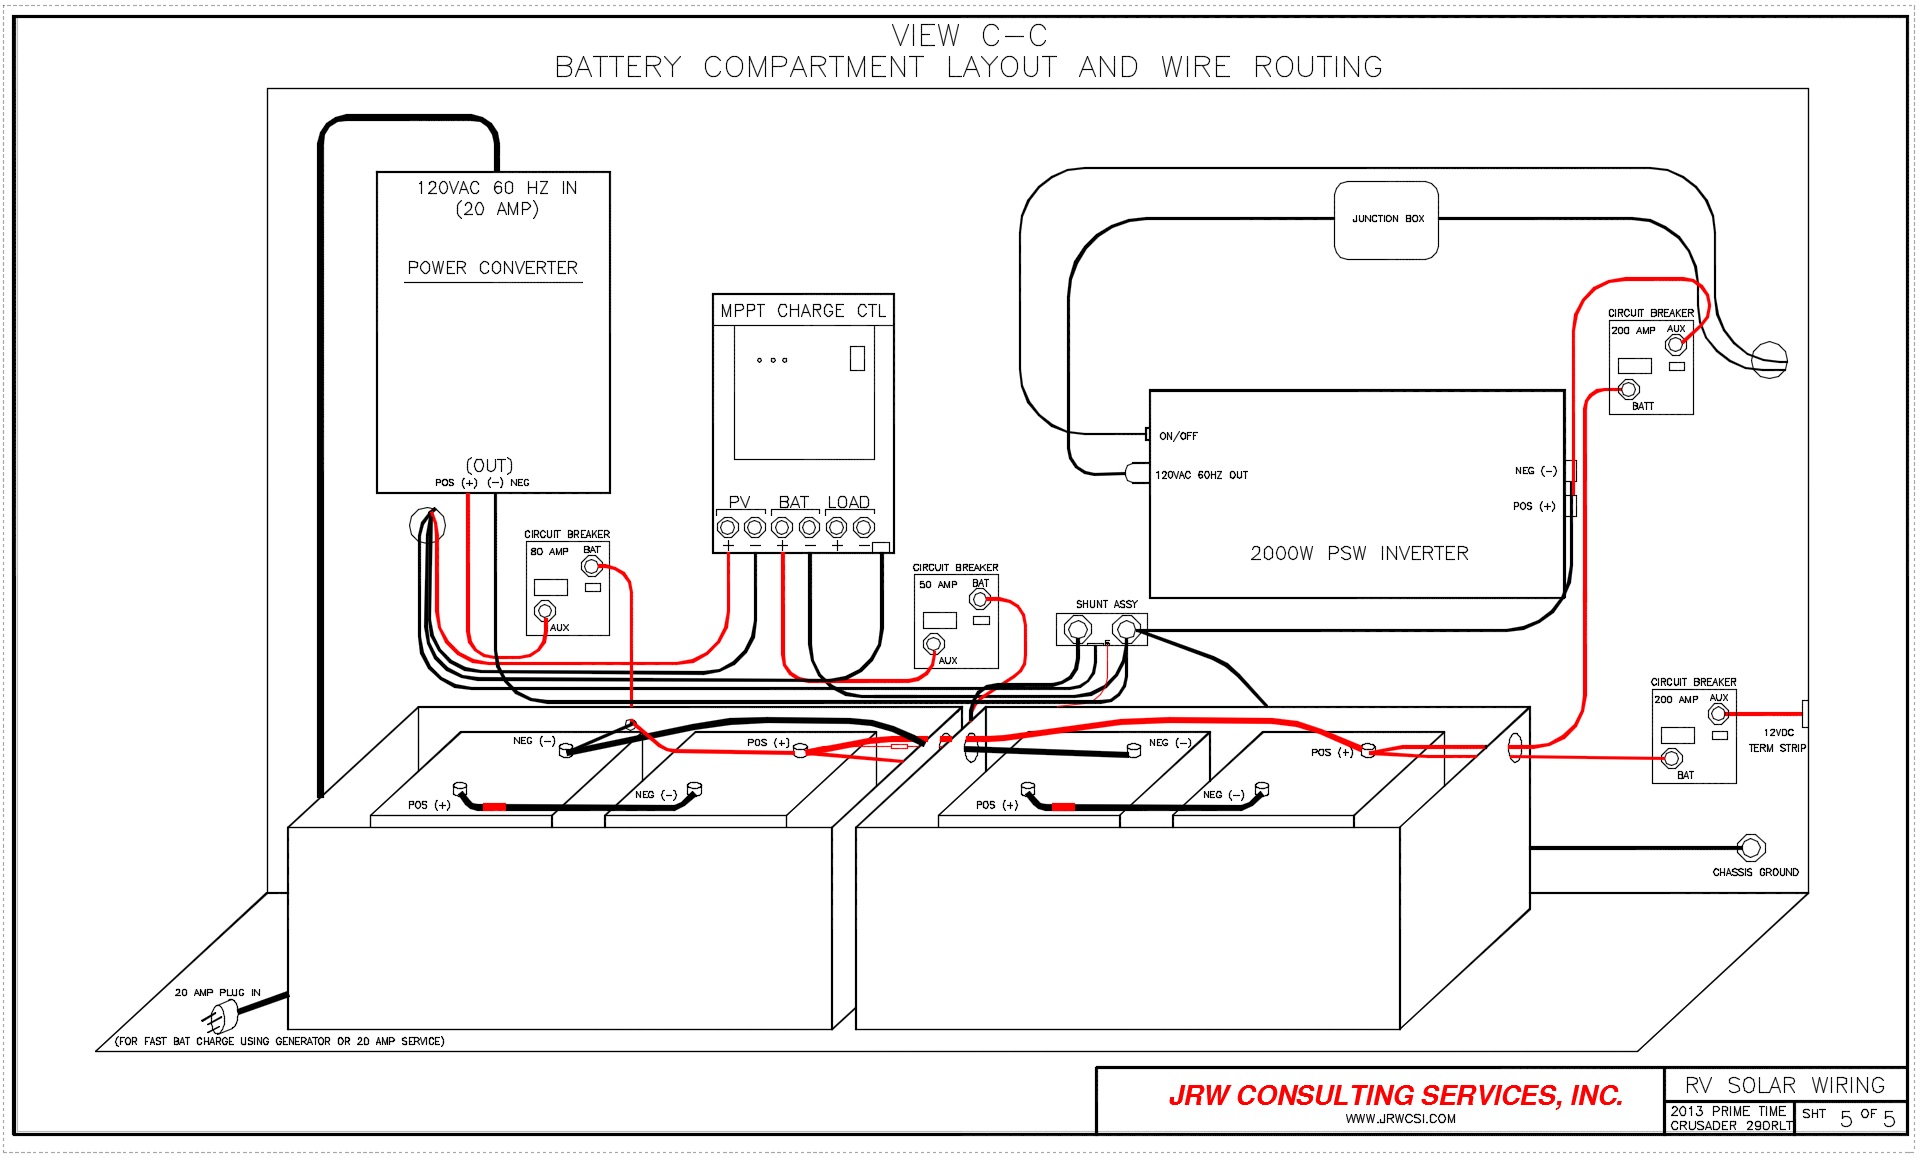
The system upgrade is now just about complete and here is a functional description along with a full set of schematics and blue prints that I created and then followed for the installation.
Step 1: Buy a portable generator
Most basic travel trailers and 5th wheels do not come equipped standard with gasoline generators the way most motor homes do. If you plan to do any boondocking or dry camping whatsoever, you will likely need a portable gasoline generator. Even with solar there are inevitably times when you need some extra juice to run appliances and recharge batteries. The Honda EU2000i is a common, relatively cost effective and relatively quiet.
Step 2: Upgrade the batteries and install a DC to AC inverter
We removed the single 12 Volt battery and replaced it with four 6-Volt 232-Amp Hour golf cart type batteries wired in a series/parallel combination resulting in a 464-Amp Hour 12-Volt battery bank. This battery bank greatly expands our amp hour capacity and has reduced our need to run the generator when dry camping. Along with the battery upgrade we also installed a 2000 Watt Pure Sine Wave inverter. This device connects to the battery bank and is wired into our AC outlets with a couple of interior switches that allow us to switch over to the inverter for AC power when we don’t have and electrical post AC hookup. This has allowed us more dry camping opportunities but still not full freedom of the noisy generator.
Step 3: Install solar system and battery monitor.
We added four solar panels and a more advanced battery monitor system. This will give us a total of 400 Watts of solar power to assist in keeping the batteries charged. The more sophisticated battery monitor gives us accurate readouts about what is going into and out of the battery at any time and it also takes some of the guess work our of maintaining the battery charge. As we have discovered there are quite a few variables beyond just measuring the voltage and charging when it gets too low. We also added a separate monitor that looks directly at the solar charge controller so that we can see exactly what is coming off the solar panels and into the battery.
Step 4: Install AC to DC power converter in the battery box.
This was really just an after thought, bonus, add on because I got a good deal on a used converter that was being removed from a friend’s rig. The converter/power panel that came with the RV is located in the rear of the kitchen area and quite a distance away from the battery bank located up front. This results in loss and slower battery charging when connected to the generator. A dedicated and advanced converter installed right by the batteries speeds the process of battery charging using the dreaded but still occasionally necessary gasoline generator when we don’t have ideal solar conditions or when we have higher than normal electrical usage. The factory equipped converter stays in place and still does all the typical battery charging and 12V powering when we have full electric hookups.
Unique Feature of this Install:
For the most part this installation is a pretty standard solar power upgrade and not unlike what quite a few people out there have done. The one feature that we designed that is not necessarily typical is the manual switching system that switches the interior AC outlets over from shore power to the inverter. Instead of one manual or automatic switch that switches all AC over from shore power to the inverter, we simply picked off the two AC outlet circuits from the circuit breaker panel and wired them down to a standard dual three way light switch. With this system installed there is no way to accidently have shore power and inverter power coming together and it also allows us to dual power our AC systems. We can disconnect the inverter, batteries and solar from the main shore power and use the solar and batteries for all the interior AC outlets but still leave the interior lighting, hot water heat, electric fireplace, and microwave connected to a shore power supply. This is especially handy when you are on a “metered” electric site or when “moochdocking” off a friends 20 amp plug in.
Detailed schematics and plans:
As I began researching this, I found tons of videos and articles about solar systems but very few had detailed schematics and blueprints like the ones I create for my aircraft engineering business. For those interested in this type of thing, I have created a drawing covering the parts, wiring and basic layout. As an aircraft design engineer of 20 years this part was relatively easy. The actual install was more of a challenge but I am happy to say things are looking good.
Some pictures of our design are below. Click for larger view or you can download a .pdf of the entire drawing here. CRUSADER_WIRING_MOD I hope to add some photos of the install once everything is buttoned up and pretty.